Category Archives: story

5 MINUTE CARAMEL WALNUTS

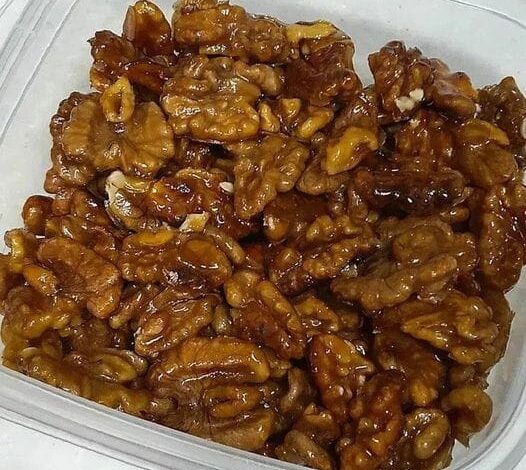
Are you craving a deliciously sweet treat that takes just minutes to prepare? Look no further than the delectable 5-Minute Caramel Walnuts. This quick and easy recipe combines the rich crunch of walnuts with the sweet allure of caramel for a snack that’s perfect for any occasion. Whether you’re hosting a gathering, satisfying your sweet tooth, or simply looking for a delightful snack, these caramel-coated walnuts are sure to be a hit.

Ingredients:

INGREDIENTS MEASUREMENTS
Walnuts 1 cup
Golden brown sugar ¼ cup + 1 tablespoon
Water ¼ cup
Unsalted butter 1 tablespoon
Salt ⅛ teaspoon + 2 pinches

Instructions:

The beauty of 5-Minute Caramel Walnuts lies not only in its delectable taste but also in its simplicity. With just a handful of ingredients and a mere five minutes, you’ll have a treat that’s sure to please.

1. Prepare the Plate

Begin by laying a piece of parchment paper on a dinner plate or a heatproof surface. This step ensures that your caramel-coated walnuts won’t stick and makes the process smoother.

2. Combine Ingredients

In a medium non-stick skillet, combine all the ingredients except for the salt. The mixture of walnuts, golden brown sugar, water, and unsalted butter will soon transform into a delightful caramel concoction that coats the walnuts perfectly.

3. Heat and Stir

Place the skillet over high heat and stir occasionally for approximately 5 minutes. During the last minute, stir constantly and reduce the heat to medium. This process allows the moisture to evaporate, and the walnuts to become darker, glossier, and form clusters of caramel-coated goodness.

4. Ensure Evaporation

It’s crucial to ensure that all the liquid evaporates before removing the skillet from the heat. This step guarantees that your caramel walnuts will have the perfect texture and flavor.

5. Transfer and Season

Quickly transfer the caramel-coated walnuts onto the prepared parchment paper. Spread them out in a single layer, ensuring each nut is evenly coated. Sprinkle 2 pinches of salt on top of the nuts to enhance the flavor and provide a delightful contrast to the sweetness.

6. Cool and Enjoy

Allow the caramel-coated walnuts to cool to room temperature. Once they’ve cooled, break them apart with your fingers, and witness the beautiful clusters of caramel-coated walnuts. Store these delectable treats in a container, but beware—they might not last long due to their irresistible taste.

Notes: A non-stick pan is essential for this recipe. If you opt for a small non-stick skillet, the cooking time may extend by an additional 30-45 seconds.

Frequently Asked Questions

Can I use dark brown sugar instead of golden brown sugar? It’s recommended to use golden brown sugar as it imparts a milder flavor that complements the walnuts without overpowering them. Dark brown sugar might alter the taste and texture.

How long do these caramel walnuts stay fresh? When stored in an airtight container, these caramel walnuts can stay fresh for several days. However, they’re so delicious that they often disappear quickly!

Can I use a regular skillet instead of a non-stick one? While it’s possible to use a regular skillet, a non-stick skillet is preferred as it prevents the caramel from sticking and ensures a smoother cooking process.

Can I add other nuts to this recipe? Absolutely! While the recipe specifically mentions walnuts, you can experiment with other nuts such as pecans or almonds for a delightful twist.

Can I reheat the caramel-coated walnuts if they become sticky after a few days? Yes, you can briefly heat the walnuts in a skillet over low heat to re-crisp the caramel coating. Be cautious not to overheat them.

Are these caramel walnuts suitable for gifting? Absolutely! These caramel walnuts make for a thoughtful and delicious gift. Package them in an attractive container or bag for a delightful homemade present.

5-Minute Caramel Walnuts are a testament to the fact that great flavor can be achieved with minimal effort. This quick and easy recipe brings together the irresistible combination of walnuts and caramel in a delightful treat that’s perfect for any occasion. Whether you’re looking for a delectable snack, a party treat, or a homemade gift, these caramel-coated walnuts are sure to leave a lasting impression. Embrace the simplicity of this recipe and indulge in a treat that offers maximum flavor with minimal fuss.

Homemade Angel Biscuits

Homemade Angel Biscuits, often referred to as “angel fluff biscuits,” are a delightful addition to any meal. These heavenly, light, and flaky biscuits are a true Southern classic, known for their ethereal texture and buttery flavor. In this article, we will take you through the step-by-step process of crafting these divine treats in your own kitchen.

Before we dive into the intricacies of making these heavenly biscuits, let’s gather the key ingredients:

INGREDIENTS QUANTITY
Active dry yeast 2 1/4 teaspoons (1 packet)
Warm water (around 110°F or 45°C) 1/4 cup
All-purpose flour 2 1/2 cups
Granulated sugar 2 tablespoons
Baking soda 1/2 teaspoon
Baking powder 2 teaspoons
Salt 1/2 teaspoon
Unsalted butter, cold and cut into small cubes 1/2 cup
Buttermilk 1 cup

Instructions:

Activating the Yeast: A Key Step

Yeast plays a crucial role in giving these biscuits their heavenly rise. Follow these steps to activate the yeast:

1. In a small bowl, mix the active dry yeast with warm water. Allow it to sit for about 5-10 minutes, or until the mixture becomes frothy.

Combining Dry Ingredients: The Foundation of Flavor

The dry ingredients are the base of our biscuit dough. Here’s how to combine them effectively:

2. In a large mixing bowl, whisk together the all-purpose flour, granulated sugar, baking soda, baking powder, and salt. This blend of ingredients sets the stage for the biscuits’ irresistible flavor.

Cutting in Butter: Creating Flaky Layers

Achieving the perfect biscuit texture requires incorporating cold butter into the dry mixture. Here’s how to do it:

3. Add the cold butter cubes to the dry ingredients. Use a pastry cutter or your fingers to work the butter into the flour until the mixture resembles coarse crumbs. This step ensures flakiness and a rich, buttery taste.

Mixing in Yeast Mixture: Bringing It All Together

Now, it’s time to unite the wet and dry components to form our biscuit dough:

4. Pour in the yeast mixture and buttermilk. Stir until the dough comes together. It will be soft and slightly sticky, a perfect canvas for our heavenly biscuits.

Kneading and Rolling Out: The Artistry Begins

Creating the perfect biscuit shape is an essential skill. Follow these steps for that ideal shape:

5. Turn the dough out onto a floured surface and gently knead it a few times to bring it together. Roll the dough to about 1/2-inch thickness.

Cutting Out Biscuits: The Shape of Heaven

The shape and size of your biscuits matter. Here’s how to ensure they turn out just right:

6. Use a round biscuit cutter to cut out biscuits from the dough. Press straight down without twisting the cutter, as twisting can prevent the biscuits from rising properly.

First Rise: Allowing the Magic to Happen

Patience is key when making angel biscuits. Give them time to rise beautifully:

7. Place the cut biscuits on a baking sheet lined with parchment paper. Cover them with a clean kitchen towel and let them rise for about 20-30 minutes.

Preheating the Oven: Setting the Stage for Perfection

The right temperature is crucial for a golden, heavenly finish:

8. Preheat your oven to 400°F (200°C) during the last few minutes of the biscuit’s rise.

Baking: The Moment of Transformation

Watch as your biscuits turn golden and divine in the oven:

9. Bake the angel biscuits for about 12-15 minutes, or until they are golden brown on top.

Serving: The Ultimate Pleasure

Finally, the most satisfying step – enjoying your heavenly creation:

10. Remove the biscuits from the oven and let them cool slightly on a wire rack. Serve them warm, split open and slathered with butter or jam.

FAQs:

Can I use instant yeast instead of active dry yeast? Yes, you can substitute instant yeast for active dry yeast. However, you may need to adjust the quantities and follow different activation instructions.

What is the purpose of buttermilk in this recipe? Buttermilk adds flavor, tenderness, and a subtle tang to the biscuits. It also activates the baking soda for a good rise.

Can I make the dough in advance and bake it later? Yes, you can prepare the dough, cut out the biscuits, and refrigerate them. Bake when you’re ready to enjoy fresh biscuits.

Can I freeze these biscuits? Absolutely! Freeze the unbaked biscuits on a tray, then transfer them to a freezer bag once they’re firm. Bake from frozen, adding a few extra minutes to the baking time.

What are some great toppings for angel biscuits? Apart from butter and jam, you can top these biscuits with honey, gravy, or even a creamy sausage sauce for a savory twist.

Why are they called “angel biscuits”? These biscuits are often called “angel biscuits” due to their incredibly light and airy texture, as if they were made by angels.

Crafting homemade angel biscuits is an art that brings delight to both the baker and the fortunate ones who get to savor these heavenly treats. With the right ingredients, techniques, and a touch of patience, you can master this recipe and create biscuits that are truly out of this world.

Remember, the journey to making these heavenly biscuits is just as delightful as the destination. So, roll up your sleeves, gather your ingredients, and embark on the adventure of creating your very own homemade angel biscuits. You won’t be disappointed.

PAULA DEEN’S 5-MINUTES FUDGE

If you’re craving a delectable treat but are short on time, look no further than Paula Deen’s 5-Minutes Fudge.This quick and easy recipe is a delightful way to satisfy your sweet tooth without spending hours in the kitchen. In this comprehensive guide, we’ll walk you through the ingredients, step-by-step instructions, and even answer some frequently asked questions about this mouthwatering fudge.

Ingredients:

Before we dive into the cooking process, let’s gather all the ingredients you’ll need to create Paula Deen’s 5-Minutes Fudge:

INGREDIENTS QUANTITY
White sugar 1 and ⅔ cups
Evaporated milk 2/3 cup
Unsalted butter 1 tablespoon
Salt ½ teaspoon
Milk chocolate chips 1 (6 ounce) package
Large marshmallows 16
Pure vanilla extract 1 teaspoon
Chopped nuts 1 cup

Instructions:

Step 1: Sugar, Spice, and Everything Nice

Let’s kick off our fudge-making journey with the first step:

Add the sugar, milk, butter, and salt together in a saucepan. Then cook for 5 minutes, while stirring constantly.

This step sets the foundation for the fudge, ensuring the sugar dissolves completely and creates a smooth texture.

Once you’ve mastered this, we move on to the next step.

Step 2: A Chocolatey Meltdown

Now it’s time to infuse that delightful chocolate flavor:

Add in chocolate chips while stirring and cook until it melts. Then remove from heat, add marshmallows, vanilla, and nuts, and stir well.

This step introduces the rich, velvety chocolate that will make your fudge irresistible. The combination of marshmallows, vanilla, and nuts adds a delightful texture and flavor profile.

Step 3: From Pan to Palate

The final step brings our fudge to life:

Pour the mixture into an 8-inch pan, leave it to cool, and cut it into squares. Serve!

This is the moment you’ve been waiting for—indulging in the creamy, heavenly goodness of Paula Deen’s 5-Minutes Fudge.

FAQs About Paula Deen’s 5-Minutes Fudge

Now, let’s address some common questions about this delectable fudge:

Can I use dark chocolate chips instead of milk chocolate chips? Absolutely! You can customize the flavor by using dark chocolate chips if you prefer a richer, more intense chocolate taste.

Can I substitute nuts with something else for a nut-free version? Of course! Feel free to replace nuts with shredded coconut, dried fruits, or even extra marshmallows for a nut-free variation.

How long can I store Paula Deen’s 5-Minutes Fudge? When stored in an airtight container, this fudge can last up to two weeks. However, it’s so delicious that it rarely lasts that long!

Can I double the recipe for a larger batch? Certainly! You can double or even triple the ingredients to make a bigger batch for gatherings or gifting.

Is this recipe suitable for beginners? Absolutely! Paula Deen’s 5-Minutes Fudge is beginner-friendly, making it a perfect choice for those new to candy-making.

Can I add other mix-ins like caramel or toffee bits? Yes, you can get creative with your mix-ins. Caramel, toffee bits, or even crushed cookies can add delightful variations to your fudge.

Paula Deen’s 5-Minutes Fudge is a delightful treat that combines ease of preparation with irresistible flavor. With a handful of simple ingredients and easy-to-follow steps, you can create a sweet masterpiece in no time.

So, the next time your sweet tooth craves something special, remember Paula Deen’s 5-Minutes Fudge—a quick, delicious, and satisfying choice for all occasions.

Ear Infection: 6 Signs You Have It

Ear infection isn’t just a childhood issue; it still affects 20% of adults. Bacteria and viruses don’t discriminate. Those with weak immune systems and ear inflammation should be vigilant. Recognize these unpleasant infections early for swift treatment.

Viral Strange brings you symptoms and prevention tips for an ear infection, but remember to consult your doctor for medical concerns.

1. Itchiness

Initially, you may experience mild itchiness in the inner ear canal, which can worsen if left untreated.

2. Redness

Redness can start inside the ear canal and progress, becoming noticeable on the inside and outside of the ear.

3. Discomfort or pain

Early on, you might feel general ear pain, especially when manipulating the earlobe or tragus. As the infection progresses, you may sense fullness in the ear. The pain may also radiate to your face, neck, or head.

4. Drainage of fluid

Odorless fluid drainage, initially minimal, can become excessive as the infection advances.

5. Muffled hearing or ringing

In severe cases, you might experience muffled hearing or persistent ringing in the affected ear.

6. Swollen neck lymph nodes

Untreated infections can lead to visibly swollen lymph nodes, often accompanied by fever due to complete ear canal blockage.

Prevention Tips for Ear Infection

1. Avoid cotton swabs and foreign objects

Refrain from using cotton swabs, which can push earwax deeper. Avoid inserting foreign objects like keys, hairpins, or paper clips, as they may worsen irritation and damage the skin.

2. Use swimming caps or earplugs

If you’re prone to ear infections, consider wearing a swimming cap to prevent water entry. Comfortable earplugs can also provide protection. Consult your doctor for additional precautions.

3. Keep ears dry with a blow-dryer

After water exposure, tilt your head and use a towel to dry your ears, facilitating water drainage. If water persists, use a blow-dryer on a low speed and heat to ensure thorough drying.

Have you ever suffered from an ear infection? How did you handle it? Tell us about your experience in the comments.

WRAPPED POTATO WITH BACON

If you’re a fan of comfort food and looking for a mouthwatering recipe to satisfy your cravings, look no further than a wrapped potato with bacon. This delightful dish combines the creaminess of potatoes with the savory goodness of bacon, creating a flavor explosion that will leave you wanting more. In this article, we will dive into the world of wrapped potatoes with bacon, exploring different recipes, cooking techniques, and tips to make this dish a standout at your next gathering.

The Versatility of Wrapped Potato with Bacon

Wrapped potato with bacon is a versatile dish that can be enjoyed as an appetizer, side dish, or even a main course. Its simplicity and crowd-pleasing flavors make it a go-to option for parties, potlucks, and family dinners. Whether you’re hosting a backyard barbecue or preparing a cozy dinner at home, wrapped potato with bacon is sure to be a hit. Let’s explore some delicious variations and recipes to get your taste buds tingling.

Classic Wrapped Potato with Bacon Recipe

Ingredients:

  • 4 medium-sized potatoes
  • 8 slices of bacon
  • Salt and pepper to taste
  • Optional toppings: shredded cheese, chopped green onions, sour cream

Instructions:

    1. Preheat your oven to 400°F (200°C).
    2. Wash the potatoes thoroughly and pat them dry.
    3. Cut each potato into 8 equal wedges.
    4. Wrap each potato wedge with a slice of bacon, securing it with a toothpick.
    5. Place the wrapped potatoes on a baking sheet lined with parchment paper.
    6. Sprinkle salt and pepper over the potatoes.
    7. Bake in the preheated oven for 25-30 minutes or until the bacon is crispy and the potatoes are tender.
    8. Remove from the oven and let them cool for a few minutes.

  1. Optional: Top with shredded cheese, chopped green onions, or a dollop of sour cream.
  2. Serve hot and enjoy!

Exploring Flavor Variations

1. Cheesy Jalapeño Wrapped Potatoes

If you’re a fan of spicy flavors, this variation is for you. Follow the classic recipe, but before wrapping the potatoes with bacon, place a slice of jalapeño and a sprinkle of shredded cheddar cheese on each potato wedge. The combination of the smoky bacon, creamy potatoes, and spicy jalapeños creates a flavor explosion that will leave your taste buds craving more.

2. Garlic and Herb Infused Wrapped Potatoes

Take your wrapped potatoes to the next level by adding a touch of garlic and herbs. After cutting the potatoes into wedges, toss them in a mixture of melted butter, minced garlic, and your favorite herbs (such as rosemary or thyme). Let the potatoes marinate for 15-20 minutes before wrapping them with bacon and baking as usual. The aromatic blend of garlic and herbs will infuse the potatoes, elevating their flavor profile.

3. Maple Glazed Wrapped Potatoes

For those who enjoy the perfect balance of sweet and savory, try the maple glazed variation. Prepare the classic recipe, but before baking, brush each bacon-wrapped potato with a mixture of maple syrup and Dijon mustard. The glaze will caramelize in the oven, adding a touch of sweetness and depth of flavor to the dish.

Tips for Perfectly Cooked Wrapped Potatoes with Bacon

  • Choose medium-sized potatoes that are uniform in size for even cooking.
  • Parboil the potatoes for 5-7 minutes before wrapping them with bacon. This helps ensure that the potatoes are fully cooked and tender.
  • For extra crispiness, place the wrapped potatoes under the broiler for the last 2-3 minutes of cooking.
  • Experiment with different bacon flavors, such as maple, hickory-smoked, or applewood-smoked, to add depth to the dish.
  • Remove the toothpicks before serving to avoid any accidents.

FAQs about Wrapped Potato with Bacon

Q: Can I make wrapped potatoes with turkey bacon for a healthier option?

A: Absolutely! Turkey bacon can be used as a substitute for traditional bacon in this recipe. While it may not crisp up as much as regular bacon, it still adds a delicious flavor to the dish. Just make sure to adjust the cooking time accordingly.

Q: Can I make this dish ahead of time?

A: Yes, you can partially prepare the wrapped potatoes ahead of time. After wrapping the potatoes with bacon, cover them tightly with plastic wrap and refrigerate for up to 24 hours. When you’re ready to serve, simply bake them according to the recipe instructions.

Q: Are there vegetarian alternatives to bacon for this recipe?

A: Certainly! If you follow a vegetarian or vegan diet, you can substitute the bacon with plant-based bacon alternatives, such as tempeh or coconut bacon. These alternatives offer a smoky flavor and crispy texture that mimic traditional bacon.

Q: Can I freeze leftover wrapped potatoes?

A: Yes, you can freeze leftover wrapped potatoes for future enjoyment. Place the cooled leftovers in an airtight container or freezer bag and store them in the freezer for up to 3 months. When you’re ready to eat them, simply reheat in the oven until heated through.

Q: What are some serving suggestions for wrapped potato with bacon?

A: Wrapped potato with bacon can be served as an appetizer with a dipping sauce, such as spicy mayo or ranch dressing. It also pairs well with grilled meats, roasted vegetables, or a fresh green salad as a main course.

Q: How can I add a tangy twist to the classic recipe?

A: To add a tangy kick to the dish, you can brush the bacon-wrapped potatoes with barbecue sauce or a mixture of honey and mustard before baking. The tanginess will complement the smoky bacon and creamy potatoes, creating a delightful flavor combination.

In conclusion, wrapped potato with bacon is a simple yet delicious dish that is sure to please your taste buds. Whether you stick to the classic recipe or try one of the flavorful variations, this crowd-pleasing dish is perfect for any occasion. So, gather your ingredients, fire up the oven, and prepare to indulge in the mouthwatering combination of creamy potatoes and savory bacon. Your friends and family will thank you for this delectable treat!

Creamed Chipped Beef on Toast

Creamed Chipped Beef on Toast, also known as “S.O.S” (Sh*t on a Shingle), is a comforting and traditional dish that has stood the test of time. It brings back memories of military mess halls and family gatherings. With its creamy, savory, and hearty taste, it’s the perfect breakfast or brunch option. In this article, we’ll guide you through creating the classic Creamed Chipped Beef on Toast.

Creamed Chipped Beef on Toast Recipe

Savor the nostalgia of Creamed Chipped Beef on Toast with its rich and satisfying flavors. Let’s dive into the recipe!

Ingredients

Below is a comprehensive table featuring all the ingredients you’ll need to make this classic Creamed Chipped Beef on Toast:

INGREDIENTS QUANTITY
Dried Chipped Beef 4 ounces
Unsalted Butter 1/4 cup
All-Purpose Flour 1/4 cup
Whole Milk 2 cups
Black Pepper 1/4 teaspoon
Worcestershire Sauce 1 teaspoon
Toast (slices) As needed
Fresh Parsley (chopped, optional) For garnish

Instructions

    1. Rinse the dried chipped beef under cold water to remove excess saltiness. Pat it dry with paper towels, then chop it into small pieces.
    2. In a medium saucepan, melt the unsalted butter over medium heat.
    1. Add the chopped dried chipped beef to the melted butter, and cook for 1-2 minutes until lightly browned and fragrant.


  1. Sprinkle the all-purpose flour over the beef and butter, stirring continuously to create a smooth paste (roux).
  2. Gradually pour the whole milk into the saucepan, stirring constantly to avoid lumps.
  3. Season the mixture with black pepper and Worcestershire sauce, giving it a delightful savory flavor.
  4. Continue cooking the sauce over medium heat, stirring occasionally, until it thickens to a creamy consistency.
  5. Toast slices of bread until golden brown and buttery.
  6. To serve, place the toasted slices on a plate and generously spoon the creamed chipped beef over the top.
  7. For an optional finishing touch, garnish with chopped fresh parsley.

Enjoy the creamy and savory goodness of Creamed Chipped Beef on Toast!

FAQ’s

  1. Can I use fresh chipped beef instead of dried? Dried chipped beef is traditional for this recipe, but you can use fresh chipped beef if you prefer. Adjust the cooking time accordingly.
  2. Can I use a different type of sauce in the creamed chipped beef? While Worcestershire sauce is classic, you can experiment with other savory sauces like hot sauce or Dijon mustard for added flavor.
  3. Can I make this dish ahead of time? It’s best to prepare and serve Creamed Chipped Beef on Toast immediately for the freshest taste and texture.
  4. Can I use a different type of bread for the toast? Absolutely! Use your favorite bread, such as white, whole wheat, or sourdough, to suit your preference.
  5. Can I add onions or garlic to the sauce? Yes, you can sauté chopped onions or garlic before adding the chipped beef to enhance the flavor.
  6. Can I store leftovers of Creamed Chipped Beef on Toast? Leftovers can be refrigerated in an airtight container for up to 2 days. Reheat gently on the stovetop or in the microwave before serving.

Creamed Chipped Beef on Toast brings back the nostalgia of simple, hearty, and delicious home-cooked meals. This classic dish is perfect for a comforting breakfast or brunch that will warm your heart and satisfy your taste buds. So, indulge in the traditional goodness of Creamed Chipped Beef on Toast and enjoy every delightful bite!

The Essentials of Eye Health: How to Prevent Infections

Our eyes are important sensory organs that help us understand our surroundings. It is essential to keep them free from hazardous diseases in order to maintain the general health and vision of the eyes.

The probable causes of eye infections include bacteria, viruses, allergies, and negligent eye care procedures. We’ll go over several key strategies for preventing eye infections and keeping your vision for years in this piece.

Wash your hands often:

One of the best ways to avoid eye infections is to keep your hands clean. Before handling contact lenses or touching your eyes, thoroughly wash your hands with soap and water. This helps to get rid of germs and viruses that can be harmful.

Avoid Touching Your Eyes:

Many surfaces that our hands come into contact with could be home to harmful microorganisms. Unnecessary touching or scratching of the eyes can introduce bacteria and irritants into the eyes, causing infections or exacerbating already present ones.

Contact lens care procedures:

If you wear contact lenses, maintain strict hygiene practices to reduce the risk of eye infections. As instructed by your eye doctor, always clean and disinfect your contact lenses. Replace them frequently and never sleep with lenses in unless your eye doctor advises you to.

Be sure to keep your eyewear clean:

Regularly clean and sanitize your glasses or sunglasses to prevent eye infections. When they come into touch with your eyes, dust, debris, and bacteria that have accumulated on these surfaces can hurt you and make you sick.

Keeping Eye Makeup Private:

Sharing eye makeup with others increases the risk of an eye infection by spreading bacteria and viruses. Don’t take someone else’s eyeliner, mascara, or eye shadow. Replace your eye makeup on a regular basis to prevent the formation of dangerous microorganisms.

Keeping Your Eyes Safe in Polluted Environments:

Air pollution can irritate and harm the eyes. If you live in a highly polluted area or are exposed to irritants like smoke, dust, or chemicals, wear protective eyewear or goggles to protect your eyes from potential harm.

Consider Allergens:

For instance, ocular allergies and infections can be brought on by pollen and pet dander. Avoid rubbing your eyes if you are prone to allergies, and use over-the-counter or prescription antihistamine eye drops to relieve symptoms.

Maintain a Healthful Lifestyle:

A well-balanced diet rich in vitamins and minerals, especially vitamin A, is necessary to maintain good eye health. Eat carrots, spinach, citrus fruits, and fish to improve your vision. In order to moisturize your eyes and reduce your risk of acquiring dry eye infections, staying hydrated is also crucial.

routine eye exams

The early detection and prevention of eye infections and other eye-related issues require routine eye exams by an optometrist or ophthalmologist. These specialists can identify any problems and offer pertinent guidance to maintain the health of your eyes.

Give Your Eyes a Break:

Your eyes may become fatigued if you stare at digital devices for extended periods of time. Look at something 20 feet away for 20 seconds every 20 minutes according to the 20-20-20 guideline. The risk of eye infection is decreased by this easy activity.

Conclusion:

Incorporate easy-to-use techniques into your everyday routine to safeguard your eyes from infections. By maintaining good cleanliness, being careful with eye care products, and scheduling routine eye exams, you may be able to preserve your eyesight.

Long-term eye health can also be improved by leading a healthy lifestyle and making wise choices in polluted environments. Remember that prevention is always preferable to cure when it comes to eyesight, therefore prioritize your eye health so you can see the world’s beauty with clear, infection-free eyes.

NO-BAKE WOOLWORTH ICEBOX CHEESECAKE

  1. If you’re looking for a delicious and easy-to-make dessert, look no further than the no-bake Woolworth Icebox Cheesecake. This classic recipe has been a favorite among dessert enthusiasts for decades. In this article, we will guide you through the step-by-step process of creating this delectable treat. So, put on your apron and let’s get started!

    Ingredients

    To create the perfect No-Bake Woolworth Icebox Cheesecake, you will need the following ingredients:

    • 2 cups of graham cracker crumbs
    • 1/2 cup of unsalted butter, melted
    • 1 cup of granulated sugar
    • 2 (8-ounce) packages of cream cheese, softened
    • 1 teaspoon of vanilla extract
    • 1 (8-ounce) container of frozen whipped topping, thawed
    • 1 can of cherry pie filling (optional)

    Instructions

    Step 1: Prepare the Crust

      1. In a medium-sized bowl, combine the graham cracker crumbs and melted butter. Mix well until the crumbs are evenly coated with butter.
      2. Press the crumb mixture into the bottom of a 9×13-inch baking dish, forming an even layer. Use the back of a spoon or a flat-bottomed glass to press the crumbs firmly.

    1. Place the baking dish in the refrigerator to chill while you prepare the filling.

    Step 2: Make the Cheesecake Filling

    1. In a large mixing bowl, beat the cream cheese until smooth and creamy.
    2. Add the granulated sugar and vanilla extract to the cream cheese. Continue beating until the mixture is well combined and smooth.
    3. Gently fold in the thawed whipped topping until fully incorporated.

    Step 3: Assemble the Cheesecake

    1. Remove the chilled crust from the refrigerator.
    2. Pour the prepared cheesecake filling over the crust, spreading it evenly with a spatula.
    3. If desired, top the cheesecake with a layer of cherry pie filling or any other fruit topping of your choice.

    Step 4: Chill and Serve

    1. Cover the baking dish with plastic wrap and refrigerate the cheesecake for at least 4 hours, or preferably overnight. This allows the flavors to meld together and the cheesecake to set.
    2. Once fully chilled and set, remove the cheesecake from the refrigerator.
    3. Cut the cheesecake into squares or slices, depending on your preference.
    4. Serve chilled and enjoy!

    Frequently Asked Questions (FAQs)

    What is a No-Bake Woolworth Icebox Cheesecake?

    The No-Bake Woolworth Icebox Cheesecake is a classic dessert recipe that requires no baking. It consists of a creamy cheesecake filling layered over a graham cracker crust and can be topped with cherry pie filling or other fruit toppings.

    Can I use a different type of crust for this cheesecake?

    Absolutely! While graham cracker crust is the traditional choice for this recipe, you can experiment with different types of crusts, such as Oreo cookie crust or shortbread crust, to add a unique twist to your cheesecake.

    Can I use fresh whipped cream instead of frozen whipped topping?

    Yes, you can substitute fresh whipped cream for frozen whipped topping. However, keep in mind that using fresh whipped cream may result in a slightly different texture and flavor.

    How long does the No-Bake Woolworth Icebox Cheesecake need to chill?

    For the best results, it is recommended to chill the cheesecake for at least 4 hours, or preferably overnight. This allows the flavors to develop and the cheesecake to set properly.

    Can I freeze the No-Bake Woolworth Icebox Cheesecake?

    Yes, you can freeze the cheesecake for future enjoyment. Ensure that it is properly wrapped or stored in an airtight container before freezing. Thaw the cheesecake in the refrigerator overnight before serving.

    Can I use a different fruit topping instead of cherry pie filling?

    Absolutely! While cherry pie filling is a popular choice, you can use any fruit topping you prefer, such as blueberry, strawberry, or even a mixed berry compote.

    The No-Bake Woolworth Icebox Cheesecake is a timeless dessert that never fails to impress. With its creamy texture and delightful flavors, it’s a treat that will have your taste buds dancing with joy. Whether you’re hosting a dinner party or simply craving a sweet indulgence, this recipe is sure to satisfy. So, gather your ingredients, follow the simple steps, and treat yourself to a slice of heaven.

Eliminate Your Pet’s Fleas Using Dawn Dish Soap and Table Salt

Fleas can be a pesky problem for pet owners, but you don’t necessarily need expensive treatments to get rid of them. Here’s a simple and cost-effective DIY flea treatment using Dawn dish soap and table salt:

Ingredients:

  • Dawn dish soap (blue variety)
  • Table salt

Instructions:

1. Prepare a Bath: Fill a bathtub or basin with warm water. Make sure the water level is enough to comfortably submerge your pet.

2. Wet Your Pet: Place your pet in the water and thoroughly wet their fur. This helps create a barrier that prevents fleas from escaping to the head area.

3. Apply Dawn Dish Soap:

Ingredients:

  • Dawn dish soap (blue variety)
  • Table salt

Instructions:

1. Prepare a Bath: Fill a bathtub or basin with warm water. Make sure the water level is enough to comfortably submerge your pet.

2. Wet Your Pet: Place your pet in the water and thoroughly wet their fur. This helps create a barrier that prevents fleas from escaping to the head area.

3. Apply Dawn Dish Soap: Take a small amount of Dawn dish soap (blue kind) and lather it in your hands. Gently massage the lather onto your pet’s fur, ensuring it reaches all areas, including underbelly and legs. The soap suffocates and immobilizes the fleas.

4. Let It Sit: Let the soap sit on your pet’s fur for a few minutes. This gives the soap time to work on the fleas.

5. Rinse Thoroughly: Thoroughly rinse your pet’s fur with clean water to remove the soap. Ensure that no soap residue remains on the skin.

6. Salt Application: After rinsing, towel-dry your pet as much as possible. Then, sprinkle a liberal amount of table salt onto your pet’s fur. Gently rub the salt into their fur. The salt acts as a desiccant and helps kill flea eggs.

7. Brushing and Drying: Using a flea comb or regular pet brush, comb through your pet’s fur to help remove dead fleas and eggs. Allow your pet to air dry.

8. Repeat If Necessary: Depending on the severity of the flea infestation, you may need to repeat the process after a few days to ensure all fleas and eggs are eliminated.

Dole Pineapple Whip

Experience Paradise in Every Bite: Dole Pineapple Whip 🍍✨

Whisk yourself away to an island paradise with a refreshing treat that’s as delightful to taste as it is easy to make. Whether you’re reminiscing about your last beach vacation or just seeking a refreshing escape from daily life, our Dole Pineapple Whip promises a tantalizing burst of tropical flavors in every spoonful. Dive into this creamy, fruity concoction and let the vacation vibes roll in!

Ingredients:

½ cup pineapple juice

2 cups frozen pineapple chunks (about 10 ounces)

1 cup vanilla ice cream (either dairy or dairy-free, your choice)

Instructions:

½ cup pineapple juice
2 cups frozen pineapple chunks (about 10 ounces)
1 cup vanilla ice cream (either dairy or dairy-free, your choice)
Instructions:
Blend: In a high-speed blender, combine the pineapple juice, frozen pineapple chunks, and ice cream. Process on medium speed for approximately 1 ½ to 2 ½ minutes, ensuring the mixture is thick and smooth. If needed for consistency, add more pineapple juice in increments of 1 tablespoon.
Serve immediately: Either scoop directly into a cup or bowl. For a fancier touch, you can transfer the mixture to a piping bag fitted with a large star tip. Freeze the bag for around 30 minutes (just enough to firm the mixture up, but not harden it). Once ready, trim the bag’s end and pipe into your preferred serving dish.
Notes:
Yield: This recipe produces about 2 cups.
Serving Size: Each serving is approximately ½ cup.
Variation with Coconut Milk: Swap out the ice cream for ¼ to ⅓ cup of unsweetened canned coconut milk or coconut cream. Adjust your whip’s consistency using pineapple juice if necessary.
Storage & Freezing: You can store the pineapple whip in an airtight container or within a piping bag for up to two weeks. Before serving, allow it to defrost for 20-30 minutes to facilitate easier scooping or piping. For convenient serving, portion the whip into disposable cups and freeze. If you’re not consuming it within a day, ensure it’s covered.

Doctors Wanted To Put Girl With Down Syndrome In An Institution, Look At Her Now As A Top Model

Note: we are republishing this story which originally made the news in February 2020.

Kennedy Garcia, a remarkable 15-year-old born with Down syndrome, has defied the predictions of doctors and is flourishing in ways no one anticipated. Her inspiring journey includes a vibrant modeling career and a heartwarming love story. Born in Colorado Springs, Colorado, Kennedy’s early prognosis was grim, with doctors forecasting a life with limited quality, even suggesting she might wear diapers into adulthood.

However, Kennedy’s mother, Renee, was determined to prove those expectations wrong. Today, Kennedy stands as a testament to her resilience. Not only is she signed with a talent agency, but she also auditions in New York and Hollywood, and has secured modeling gigs with renowned brands like American Girl, Justice Clothing, and Disney.

Doctors initially offered a bleak outlook upon Kennedy’s birth, urging Renee to consider adoption or institutionalization. These dismissive attitudes spurred Renee to challenge conventional thinking. One day, a chance encounter with a midwife who shared her own experiences raising a daughter with Down syndrome ignited a spark of hope in Renee’s heart.

Kennedy’s journey hasn’t been without hurdles. She battled leukemia and underwent risky surgery to correct a spinal condition that could have left her paralyzed. Undeterred by challenges, Kennedy emerged victorious, recovering her strength and even pursuing her passion for dance. She embraced modeling and acting, signing with KMR Diversity and Dream Talent Management agency. Her auditions in major cities and appearances in commercials and TV shows, including “This is Us,” are a testament to her determination.

Beyond her professional achievements, Kennedy enjoys a fulfilling personal life. Close to her siblings and surrounded by a supportive group of friends, Kennedy radiates joy. She also shares a heartwarming love story with Matthew, whom she met at an audition when she was 12. Despite both having genetic conditions, their connection blossomed into a heartwarming relationship.

Kennedy’s presence on social media platforms showcases her typical teenage interests—texting friends, making TikTok videos, and discussing life’s topics, including boys. She also visits schools to raise awareness about Down syndrome, advocating for inclusive friendships and understanding.

Renee’s ultimate wish for her daughter is to live a fulfilled life, regardless of the path she chooses. Kennedy’s inspiring journey highlights the progress society has made in embracing diversity and offers hope for the future.

Long John Silver’s Batter

Ingredients:

  • 1 cup all-purpose flour
  • 1 teaspoon baking powder
  • 1/2 teaspoon salt
  • 1/2 teaspoon paprika
  • 1/2 teaspoon garlic powder
  • 1/4 teaspoon onion powder
  • 1/4 teaspoon black pepper
  • 1 cup cold water

Instructions:

  1. Mix Dry Ingredients:
    • In a mixing bowl, combine the all-purpose flour, baking powder, salt, paprika, garlic powder, onion powder, and black pepper. Mix well to evenly distribute the spices.
  2. Add Water:
    • Gradually add the cold water to the dry ingredients while whisking. Continue whisking until the batter is smooth and free of lumps.
  3. Rest the Batter:
    • Let the batter rest for about 10-15 minutes. This allows the ingredients to fully hydrate and the flavors to meld.
  4. Coat Seafood:
    • Dip your seafood of choice (such as fish fillets, shrimp, or other seafood) into the batter, ensuring they are well coated.
  5. Fry:
    • Heat oil in a deep fryer or a deep skillet to around 350°F (175°C).
    • Carefully place the battered seafood into the hot oil and fry until golden brown and crispy. This usually takes a few minutes, depending on the thickness of the seafood.
  6. Drain and Serve:
    • Once the seafood is cooked to a crispy golden brown, remove it from the oil using a slotted spoon and place it on a plate lined with paper towels to drain any excess oil.
  7. Serve:
    • Serve your delicious homemade Long John Silver’s-style battered seafood with your favorite dipping sauces and sides.

This batter recipe captures the essence of Long John Silver’s crispy and flavorful coating. Enjoy the taste of classic seafood fare right in your own kitchen.

CARAMEL PECAN DREAM BARS

These Caramel Pecan Dream Bars really are dreamy and if it weren’t for The Recipe Tin Project, I never would have known they existed. They take approximately five minutes to get into the oven and they rely mostly on kitchen shortcuts that are easy to keep in your pantry so they are the type of dessert that’s easy to whip up on a moment’s notice. It’s hard not to fall in love with a dessert bar that’s sticky, sweet, and full of toffee flavor so it’s easy to see why Emily took the time to commit this one to paper. And I’m sure glad she did.

Ingredients

FOR THE CRUST:
1 box yellow cake mix
1/3 cup soft margarine
1 egg

FOR THE FILLING:
1 (14 oz) can sweetened condensed milk
1 cup pecans, chopped
1/2 cup bits o’ Brickle baking chips

How To Make Caramel Pecan Dream Bars

Preheat oven to 350°F and grease a 9×13-inch baking pan with nonstick spray.
Mix together the cake mix, margarine, and egg and press into the bottom of the prepared pan.
Pour filling ingredients (sweetened condensed milk, pecans, bits o’ brickle) over the base and bake 25-30 minutes.
Let cool before cutting. Enjoy!

Hershey’s Cocoa Fudge

If you’re a fan of sweet and chocolaty treats, Hershey’s Cocoa Fudge is an absolute must-try! This iconic fudge offers a rich, creamy texture with a burst of cocoa goodness in every bite. In this article, we’ll provide you with a comprehensive guide to create the perfect Hershey’s Cocoa Fudge right in your own kitchen.

Whether you’re a seasoned baker or a novice in the kitchen, our easy-to-follow recipe, complete with a table sheet format of ingredients, will ensure your fudge turns out perfectly every time. So, let’s dive into this delightful journey of creating the ultimate Hershey’s Cocoa Fudge!

Hershey’s Cocoa Fudge Recipe

Follow this step-by-step guide to create the luscious Hershey’s Cocoa Fudge that will leave your taste buds craving for more. Here’s a table with the necessary ingredients:

INGREDIENTS QUANTITY
Granulated Sugar 2 cups
Hershey’s Cocoa 3/4 cup
Milk 1/2 cup
Unsalted Butter 1/2 cup (1 stick)
Vanilla Extract 1 tsp
Salt 1/4 tsp
Chopped Nuts (optional) 1/2 cup

The Perfect Blend of Flavors

In this section, we’ll explore how each ingredient contributes to the delightful taste and texture of Hershey’s Cocoa Fudge.

  • Granulated Sugar: The primary sweetener in this recipe, granulated sugar adds the perfect amount of sweetness to the fudge.
  • Hershey’s Cocoa: The star of the show, Hershey’s Cocoa, provides a deep and rich chocolate flavor that makes this fudge truly irresistible.
  • Milk: Milk not only adds moisture to the fudge but also helps in balancing the richness of cocoa.
  • Unsalted Butter: Butter adds a luxurious creaminess to the fudge, enhancing its overall texture.
  • Vanilla Extract: A splash of vanilla extract elevates the chocolate flavor and adds a delightful aroma.
  • Salt: A pinch of salt may seem surprising, but it’s the secret ingredient that enhances all the flavors and brings out the richness of the chocolate.
  • Chopped Nuts (optional): If you prefer some added crunch and flavor, consider tossing in some chopped nuts. Pecans or walnuts work wonderfully with this recipe.

Step-by-Step Instructions

Let’s now take you through the process of making the mouthwatering Hershey’s Cocoa Fudge:

    1. Prepare the Pan: Line an 8-inch square baking pan with parchment paper, ensuring it hangs over the edges. This will help with easy removal of the fudge later.
    2. Combine Ingredients: In a saucepan, mix together the granulated sugar, Hershey’s Cocoa, and salt. Gradually stir in the milk until the mixture is well combined.

  1. Cook Over Medium Heat: Place the saucepan on the stove over medium heat. Stir continuously until the mixture reaches a boil. Once it starts boiling, stop stirring and let it cook for exactly 4 minutes. Use a timer to ensure accuracy.
  2. Add Butter and Vanilla: Remove the saucepan from heat and add the unsalted butter and vanilla extract. Stir well until the butter is fully melted and incorporated.
  3. Optional: Add Nuts: If you’re including nuts, gently fold them into the mixture at this stage.
  4. Beat the Mixture: Transfer the mixture to a heat-resistant mixing bowl. Beat it vigorously for about 2 minutes until the fudge starts to thicken and lose its gloss.
  5. Pour into Pan: Pour the fudge mixture into the prepared baking pan, spreading it evenly with a spatula.
  6. Cool and Set: Allow the fudge to cool at room temperature for about 2 hours until it sets completely.
  7. Cut into Squares: Once the fudge is set, lift it from the pan using the parchment paper. Cut it into squares of your desired size.

FAQs

  1. Can I use cocoa powder instead of Hershey’s Cocoa?
    • Yes, you can substitute Hershey’s Cocoa with unsweetened cocoa powder from other brands. However, keep in mind that the flavor might vary slightly.
  2. How long does Hershey’s Cocoa Fudge last?
    • When stored in an airtight container in the refrigerator, Hershey’s Cocoa Fudge can stay fresh for up to two weeks.
  3. Can I freeze Hershey’s Cocoa Fudge?
    • Absolutely! Wrap the fudge tightly in plastic wrap and place it in an airtight container before freezing. It should last for about three months.
  4. What nuts work best in this recipe?
    • Pecans and walnuts are the most popular choices, but you can experiment with almonds or hazelnuts as well.
  5. Can I add other mix-ins to the fudge?
    • Yes, you can get creative and add ingredients like mini marshmallows, dried fruits, or even crushed candy canes for a festive twist.
  6. Can I use condensed milk instead of regular milk?
    • While it is possible, using condensed milk will make the fudge much sweeter and richer. Adjust the sugar accordingly.

Congratulations! You’ve successfully learned how to make the scrumptious Hershey’s Cocoa Fudge with a delightful blend of chocolatey goodness and creamy texture. Remember to follow the recipe closely and explore various mix-ins to customize this classic treat to your liking.

So, why wait? Gather your ingredients, don your apron, and create the perfect Hershey’s Cocoa Fudge that will impress your friends and family. Happy baking!

The Unfiltered Truth of Postpartum Bodies

The unfiltered truth is that the female body faces daily judgment and unrealistic beauty standards. Postpartum bodies are especially sensitive to this, but one mother decided to embrace her flaws and support others by shedding the filters and clothing.

The challenges that come after childbirth often catch most mothers off guard.

Danisha, a mother of four, has begun sharing her body acceptance journey on social media. Initially feeling ashamed of her postpartum belly, she decided to make a change with her last baby.

She said: “I didn’t know that I would have as much loose skin as I do now, and stretch marks. No one ever discussed it, my doctors didn’t discuss it. I didn’t know that my body just wouldn’t look the same anymore. But I want to embrace my body, and I’m happy where I’m at.”

According to Danisha, a woman’s body has the power to create miracles.

Celebrity pregnancy photos can create a false image of perfection, leading to lowered self-confidence and self-love among women.

Through an Instagram post, she encouraged fellow moms by stating, “Don’t let society trick you into believing you need to be ’fixed.’ Your body is not wrong, society is!”

The mothers’ postpartum bodies are expected to conform to a different societal image.

New mothers are often pressured to regain their pre-pregnancy bodies. However, this expectation can make them feel like strangers in their skin. Instead, accepting and loving oneself postpartum is crucial for true self-love.

Danisha’s candid posts make her proud of who she is. She recognizes that everybody evolves differently, and her postpartum belly reminds her of her four beautiful children and signifies growth. Though it took time, she has learned to accept, love, and appreciate her body.

She said: “Our body is meant to evolve and change, that is what happens with growth, not everyone’s body will change the same and that’s okay. My wonderful body carried 4 beautiful blessings, my belly is a reminder of that and signifies growth. It has taken me a long time to accept her, love her, and appreciate her.”

Keeping positivity online is challenging, especially when facing criticism from all directions. It can be one of the toughest aspects of vulnerability.

“I have a pouch, I have soft stretchy loose skin. My physical features are not what makes it beautiful, but the fact that my body was able to create life itself for a fourth time. I’m strong as a mother,” said Danisha.

Despite negative comments, Danisha continues to share the unfiltered truth about postpartum bodies.

She wants to help other mothers who may be unprepared for the realities of motherhood. She said: “A lot of mamas are unprepared for postpartum.”

Watching our bodies change as we age is a privilege.

Despite our best efforts to stay fit, genetics can sometimes alter our appearance. As she explained, the person in the mirror may look different. Danisha said: “I love it when people tell me that if I had moisturized my skin more then my belly wouldn’t have looked ’this way’ or if I wore a waist trainer I wouldn’t have a pouch and even greater if I dieted or exercised more, then my belly wouldn’t be as ‘big.’The reality is genetics play a big role. My belly is this way because of 4 reasons. I created life 4 times and no oils or creams would have miraculously prevented it. My sagging skin, stretch marks, and other love marks are reminders of bearing my children.”

Mothers are unique in their own right and should not face discrimination based on their physical appearance.

She declared: “To the mama looking at herself in the mirror: It’s completely normal not to fit into your pre-pregnancy clothes your body outgrew in order to make room for your beautiful blessing. Sizing up is nothing to feel ashamed of.”

Accepting her body was a difficult journey, but Danisha persevered.

Learning to love and accept stretch marks and body changes can be challenging for moms. However, these changes are a natural response of the body.

“Many would love to have tiger stripes. You can also have them without having children. My tummy was home to 4 of my children, and they love it,” she said.

True beauty emanates from within and without.

Despite our outward appearance, including differences in skin color or weight, every individual is unique and their body plays an incredible role in their survival. This mother highlights this to inspire others: “Whether you choose to cover your belly or not, you’re still worthy, still beautiful.”

Do you agree that all mothers are special in their way? Should we talk more about the unfiltered truth? Share your thoughts in the comments.

“The kids love them.”, Open-face garlic toast sloppy joes

Are you looking for a quick and tasty meal that will satisfy even the pickiest eaters? Look no further than Open-face Garlic Toast Sloppy Joes! This mouthwatering dish combines the rich flavors of traditional sloppy joes with the irresistible crunch of garlic toast. In this article, we’ll take you through step-by-step instructions on how to create this delectable treat, along with insights and tips to make it a family favorite.

Ingredients:

INGREDIENT QUANTITY
Lean ground beef 1 pound
Spaghetti sauce 2 cups (adjust to preference)
Frozen garlic toast 8 slices
Mozzarella cheese 1 cup (shredded)
Fresh parsley Chopped

Instructions:

    1. Preheat the Oven: Begin by preheating your oven to the temperature indicated on the garlic toast packaging.
    2. Brown the Ground Beef: In a skillet, crumble the lean ground beef and cook it over medium-high heat until fully browned. Drain any excess fat.

  1. Add the Sauce: Stir in the spaghetti sauce to the cooked ground beef. Let the meat sauce simmer for 7-10 minutes, stirring occasionally to allow the flavors to meld.
  2. Prepare the Garlic Toast: While the meat sauce simmers, follow the package instructions to bake the frozen garlic toast until both sides are golden brown.
  3. Assemble the Open-face Sloppy Joes: Once the garlic toast is ready, spoon the meat sauce generously over each slice. Top with a layer of shredded mozzarella cheese.
  4. Final Touch: Place the prepared open-face garlic toast sloppy joes back in the oven for a couple of minutes, just until the cheese melts and turns gooey.
  5. Garnish and Serve: Sprinkle chopped fresh parsley over the cheesy creations before serving. The vibrant green adds a pop of color and a burst of freshness.

Experience the Flavorful Fusion

Open-face Garlic Toast Sloppy Joes are a delightful fusion of textures and tastes. The tender and savory meat sauce pairs harmoniously with the crispy garlic toast, creating a medley of flavors that will leave your taste buds dancing. The melted mozzarella cheese adds a creamy richness that perfectly complements the robust flavors of the dish.

For those evenings when you need a satisfying meal in a hurry, these open-face sloppy joes are a lifesaver. They come together quickly, making them an ideal option for busy weeknights or impromptu gatherings. Plus, they offer a unique twist on the classic sloppy joe sandwich that both kids and adults will adore.

FAQs:

Can I use a different type of meat for this recipe? Absolutely! While lean ground beef is the traditional choice, you can easily substitute it with ground turkey, chicken, or even plant-based alternatives for a lighter version.

How can I make the meat sauce more flavorful? Experiment with adding spices like garlic powder, onion powder, or even a pinch of red pepper flakes to the meat sauce. Adjust the seasonings to suit your taste preferences.

Can I make this recipe ahead of time? While the garlic toast is best enjoyed fresh, you can prepare the meat sauce ahead of time and store it in the refrigerator. When ready to serve, reheat the sauce and assemble the open-face sloppy joes.

What side dishes pair well with this dish? These open-face sloppy joes go wonderfully with a crisp green salad, coleslaw, or even a side of sweet potato fries. The combination of flavors and textures makes for a satisfying meal.

Can I freeze the leftovers? While it’s best to enjoy these sloppy joes fresh, you can freeze any leftover meat sauce for future use. Thaw and reheat the sauce before serving.

How can I make the garlic toast from scratch? If you prefer homemade garlic toast, slice a baguette or your favorite bread, brush it with melted butter, and sprinkle with garlic powder and grated Parmesan cheese. Toast until golden and crisp.

Open-face Garlic Toast Sloppy Joes are a delightful twist on a classic comfort food, combining the familiar flavors of sloppy joes with the irresistible crunch of garlic toast. With a few simple ingredients and easy-to-follow instructions, you can create a satisfying meal that will have your family asking for seconds. Whether it’s a quick weeknight dinner or a casual gathering, these open-face sloppy joes are sure to please both young and old. So why not give them a try and experience the delicious fusion of flavors for yourself?